Skip to content
How to Care for Wooden Earrings
Wooden earrings last longer when I keep them dry, clean them based on the finish, and store them away from heat, sun, and humidity. Wood can soak up sweat, water, and product residue, and even small shifts in moisture can lead to fading, roughness, warping, or cracks over time.
If I want a simple care routine, this is it:
- Check the finish first: raw, oil/wax-finished, sealed, or painted
- Start with a dry microfiber cloth
- Use only a lightly damp cloth if needed
- Never soak them or use harsh cleaners
- Oil only unfinished wood every 2–4 months
- Store them in a cool, dry place - not the bathroom
A few habits do most of the work. A dry wipe after each wear helps remove skin oils and dust. Taking them off before showering, swimming, sleeping, or working out cuts down on moisture exposure. And if the pair has silver hooks or glued parts, I treat those parts with extra care.
| Finish | Best care |
|---|---|
| Raw wood | Dry cloth only |
| Oil/wax finish | Dry cloth, light re-oiling now and then |
| Sealed wood | Slightly damp cloth, dry at once |
| Painted wood | Slightly damp cloth, no oil |
In short, I don’t need much: just a soft cloth, very little moisture, and dry storage. The rest is just keeping the finish in mind each time I clean.
Know Your Wooden Earrings Before You Clean Them
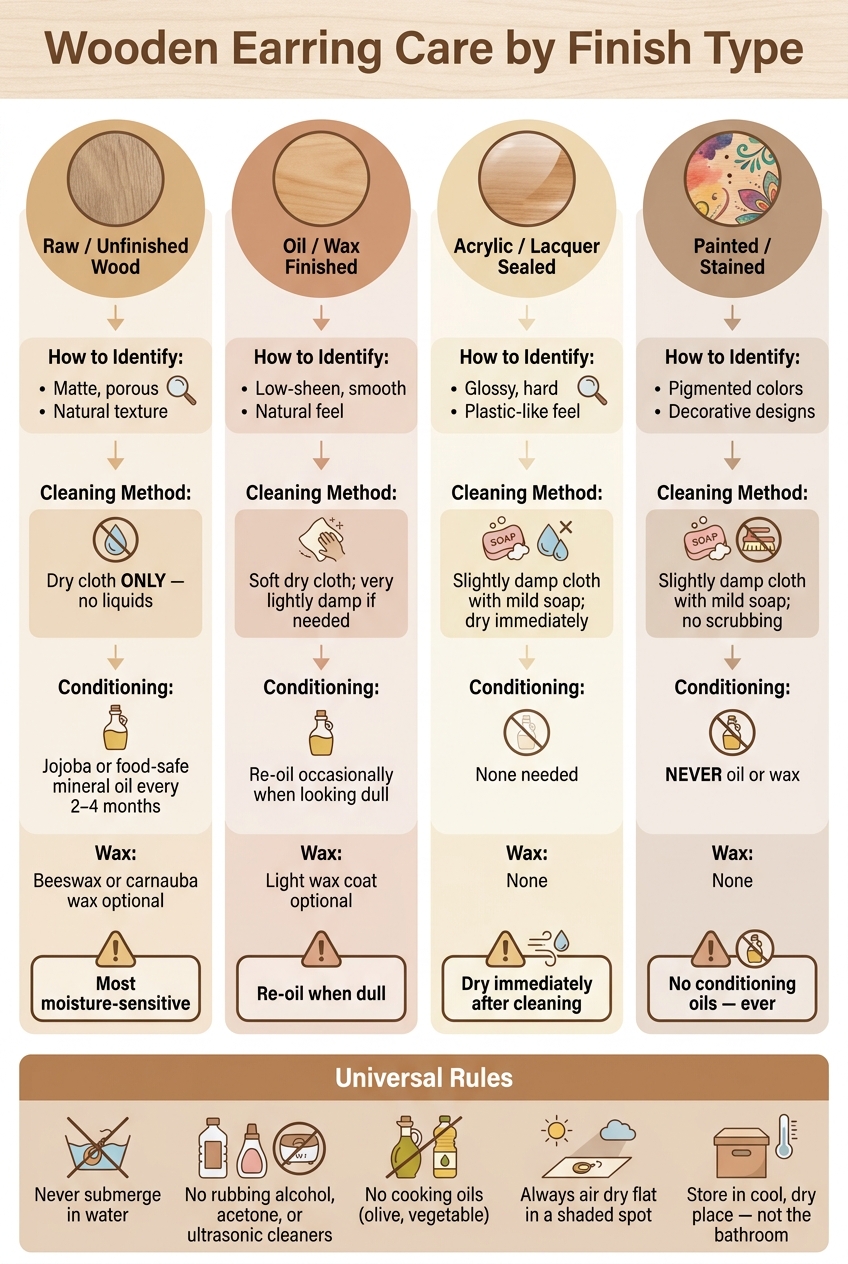
Wooden Earring Care by Finish Type: Quick Reference Guide
Start by figuring out the finish and hardware. That matters more than most people think. Raw, sealed, and painted wood all need different care, so the safest move is to match the finish to the cleaning method before you do anything else.
Raw, Sealed, and Painted Wood Each Need Different Handling
Acrylic or lacquer-sealed wood has a glossy, hard, plastic-like surface. Oil- or wax-finished wood has a low-sheen, smooth, natural feel. Raw, unfinished wood is matte and porous, and it absorbs moisture much faster than finished wood.
Painted or stained earrings need a gentler touch. Conditioning oils can lift the finish.
| Finish Type | How to Identify | Key Care Rule |
|---|---|---|
| Raw / Unfinished | Matte, porous, natural texture | Dry cloth only; avoid liquids |
| Oil / Wax Sealed | Low-sheen, smooth, natural feel | Soft dry cloth; re-oil occasionally |
| Acrylic / Lacquer | Glossy, hard, plastic-like feel | Damp cloth with mild soap; dry immediately |
| Painted / Stained | Pigmented colors or decorative designs | Damp cloth with mild soap; no conditioning oil |
Use the rule that matches your earrings before you clean.
Check the Hooks, Posts, and Mixed Materials First
After that, inspect the hardware. Many wooden earrings use metal findings, like hooks or posts made from surgical steel, gold-plated findings, or sterling silver. Sterling silver can tarnish, so it should be cleaned separately from the wood.
It also helps to check for loose findings, weak glue joints, or existing cracks before adding any moisture. Water can make cracks spread. And if the earrings include mixed materials, those parts may react to cleaners in ways the wood won’t.
When in doubt, stick to a dry cloth.
Clean each material on its own, especially if you’re dealing with metal, paint, or glued parts. Once you know the finish and hardware, you’re ready for the cleaning steps.
How to Clean Wooden Earrings Step by Step
Match the cleaning method to the finish, and keep moisture to a minimum.
What You Need and How to Set Up
Get your supplies together first: a soft microfiber cloth, lukewarm water, a drop of mild soap, gold jewelry cleaner for metal components, and cotton swabs or a soft-bristled toothbrush for carved details. Keep a second dry, absorbent cloth close by so you can dry the earrings right away.
Avoid harsh cleaners - no rubbing alcohol, acetone, jewelry dips, or ultrasonic cleaners. They can strip the finish. Also skip cooking oils like olive or vegetable oil. They can turn sticky on wood and leave residue behind.
Once everything is ready, begin with the gentlest option.
Start Dry, Then Spot Clean With a Damp Cloth
Begin with the dry cloth. Wipe the full surface to remove dust and skin oils. For light buildup, that may be all you need.
If some grime sticks around, mix a drop of mild soap into lukewarm water and dampen the cloth. It should be slightly damp, not wet. Wipe the wood in small sections, following the grain. For crevices or carved areas, use a lightly damp cotton swab or soft toothbrush instead of pressing a cloth into the detail. Never submerge the earrings or hold them under running water. Too much moisture can make the wood swell, warp, or feel rough. Dry them at once with the absorbent cloth, and don't use a hairdryer or any heat source to speed things up.
How to Clean Painted or Sealed Earrings
If the earrings are painted or sealed, use the same basic method but with an even lighter touch. Painted or acrylic/lacquer-sealed earrings should be cleaned with a slightly damp cloth with a trace of mild soap and no scrubbing.
Lay them flat in a shaded, airy spot and let them air dry all the way.
Once the earrings are fully dry, move on to long-term care and storage.
How to Maintain and Store Wooden Earrings Long-Term
After cleaning and drying, long-term care is pretty simple. Focus on conditioning, protection, and storage. Only condition unfinished wood, then help it last with a few smart day-to-day habits.
How to Condition Dry Wood With Oil or Wax
Condition raw wood when it starts to look dull, dry, or a little rough. Add a tiny drop of jojoba oil or food-safe mineral oil to a soft cloth, then rub it gently into the wood. After that, buff away all extra oil with a clean, dry cloth.
If you want a bit more surface protection, apply a light coat of beeswax or carnauba wax over the oil. On unpainted wood, this adds a light layer that helps resist moisture. Stick with jojoba oil or food-safe mineral oil only, and repeat the process every few months if you wear the earrings often.
Do not oil or wax painted wood.
Daily Habits That Prevent Cracks, Fading, and Warping
A few small habits can save you a lot of wear and tear. Put wooden earrings on after lotions and sprays have dried. Take them off before sleeping, showering, working out, or swimming. That helps keep residue from dulling or softening the finish.
Moisture isn't the only problem. Heat from a hot car or a nearby heater can dry wood fast and lead to warping or cracks. Sunny windowsills can also do damage over time because of UV exposure.
How to Store Wooden Earrings Properly
Once the finish is protected, how to store jewelry becomes your last layer of care. Soft fabric pouches or fabric-lined jewelry boxes help cushion the wood and stop pairs from rubbing against heavier metal or stone jewelry.
Bathrooms are a poor storage spot because daily showers leave behind humidity that can warp wood over time. A bedroom drawer or travel case in a cool, dry place works much better. If you keep earrings in a sealed case, or if your area tends to be humid, add one or two silica gel packets to help absorb extra moisture.
Conclusion: A Simple Routine to Keep Wooden Earrings Looking Good
Once you know the finish and the right way to clean it, the rest comes down to doing the same small things over time. Wooden earrings tend to last longer when the care matches the finish. Raw and oil-finished wood need more attention than sealed pairs, and painted wood should never be oiled.
The routine is simple: wipe, dry, store, and protect. Keep them in a cool, dry place away from moisture and direct sunlight.
Key Takeaways for Ongoing Care
Dry-wipe, inspect, clean only when needed, condition unfinished wood on schedule, and store everything in a dry spot. A quick dry wipe after each wear helps remove skin oils and dust. Check the hooks and the wood once a week for dryness or loose findings. Deep clean only when you can see dirt or buildup.
Condition unfinished wood every 2–4 months with food-safe mineral oil or a beeswax blend. Sealed or acrylic-coated earrings usually need very little care beyond an occasional buff with a microfiber cloth to bring back shine.
Use the table below as a quick-reference care plan.
| Care Action | Frequency | Purpose |
|---|---|---|
| Dry wipe | After every wear | Removes skin oils and dust |
| Inspection | Weekly | Checks for loose findings or dry wood |
| Deep clean | Only when soiled | Removes stubborn grime with a damp cloth |
| Conditioning | Every 2–4 months | Restores moisture to unfinished wood |
| Buffing | As needed | Restores shine with a microfiber cloth |
That’s the full routine: gentle, repeatable, and easy to follow - the kind of care wooden earrings do best with.
FAQs
How can I tell what finish my wooden earrings have?
Pay close attention to the surface and the way it feels in your hand. Acrylic or polyurethane often feels rigid, glossy, or a bit plasticky. Oil, wax, or shellac, on the other hand, usually feels more natural and matte.
If you can clearly see the wood grain and the surface feels smooth without that glass-like slickness, there's a good chance it has a natural finish. If you notice a more obvious, thicker hard layer sitting on top, that usually points to a synthetic coating.
What should I do if my wooden earrings get wet?
Pat your wooden earrings dry right away with a soft, clean cloth. Then let them air dry all the way before you wear or store them.
Skip the blow dryer and any other heat source. Heat can crack the wood. And while sealed wood has some protection, it isn't waterproof. Too much moisture over time can cause warping or leave the finish looking dull.
How do I clean wooden earrings with silver hooks or glued parts?
Wipe the wood with a soft, dry cloth to clear away dust and skin oils. If you need a bit more help, use a slightly damp cloth. Just don’t soak the earrings or clean them with harsh soaps or chemicals, since those can harm the wood or weaken the glue.
For silver hooks, use a jewelry polishing cloth to rub off tarnish. Skip liquid silver dips, and dry the earrings well with a second soft cloth right after cleaning.